| Platform: | iOS (App Store), Android (Google Play Store), PC (Windows/Mac) |
| Engine: | C++ Console Project (demo), Unreal Engine 4 (prototype), Unity |
| Language: | C++, C# |
| Tools Used: | Visual Studio, Photoshop, Audition, After Effects, Adobe XD, Figma, Premiere Pro |
| Duration: | 2017: 1 day (C++ project)
2021: 1 week (Unreal Engine project) 2024: 4 months (Unity all features till release) |
| Completion: | 2024 |
| Role: | Concept development, gameplay programming, graphic
design, SFX programming, UI development, testing, debugging, ads/in-app purchases programming, and publishing |


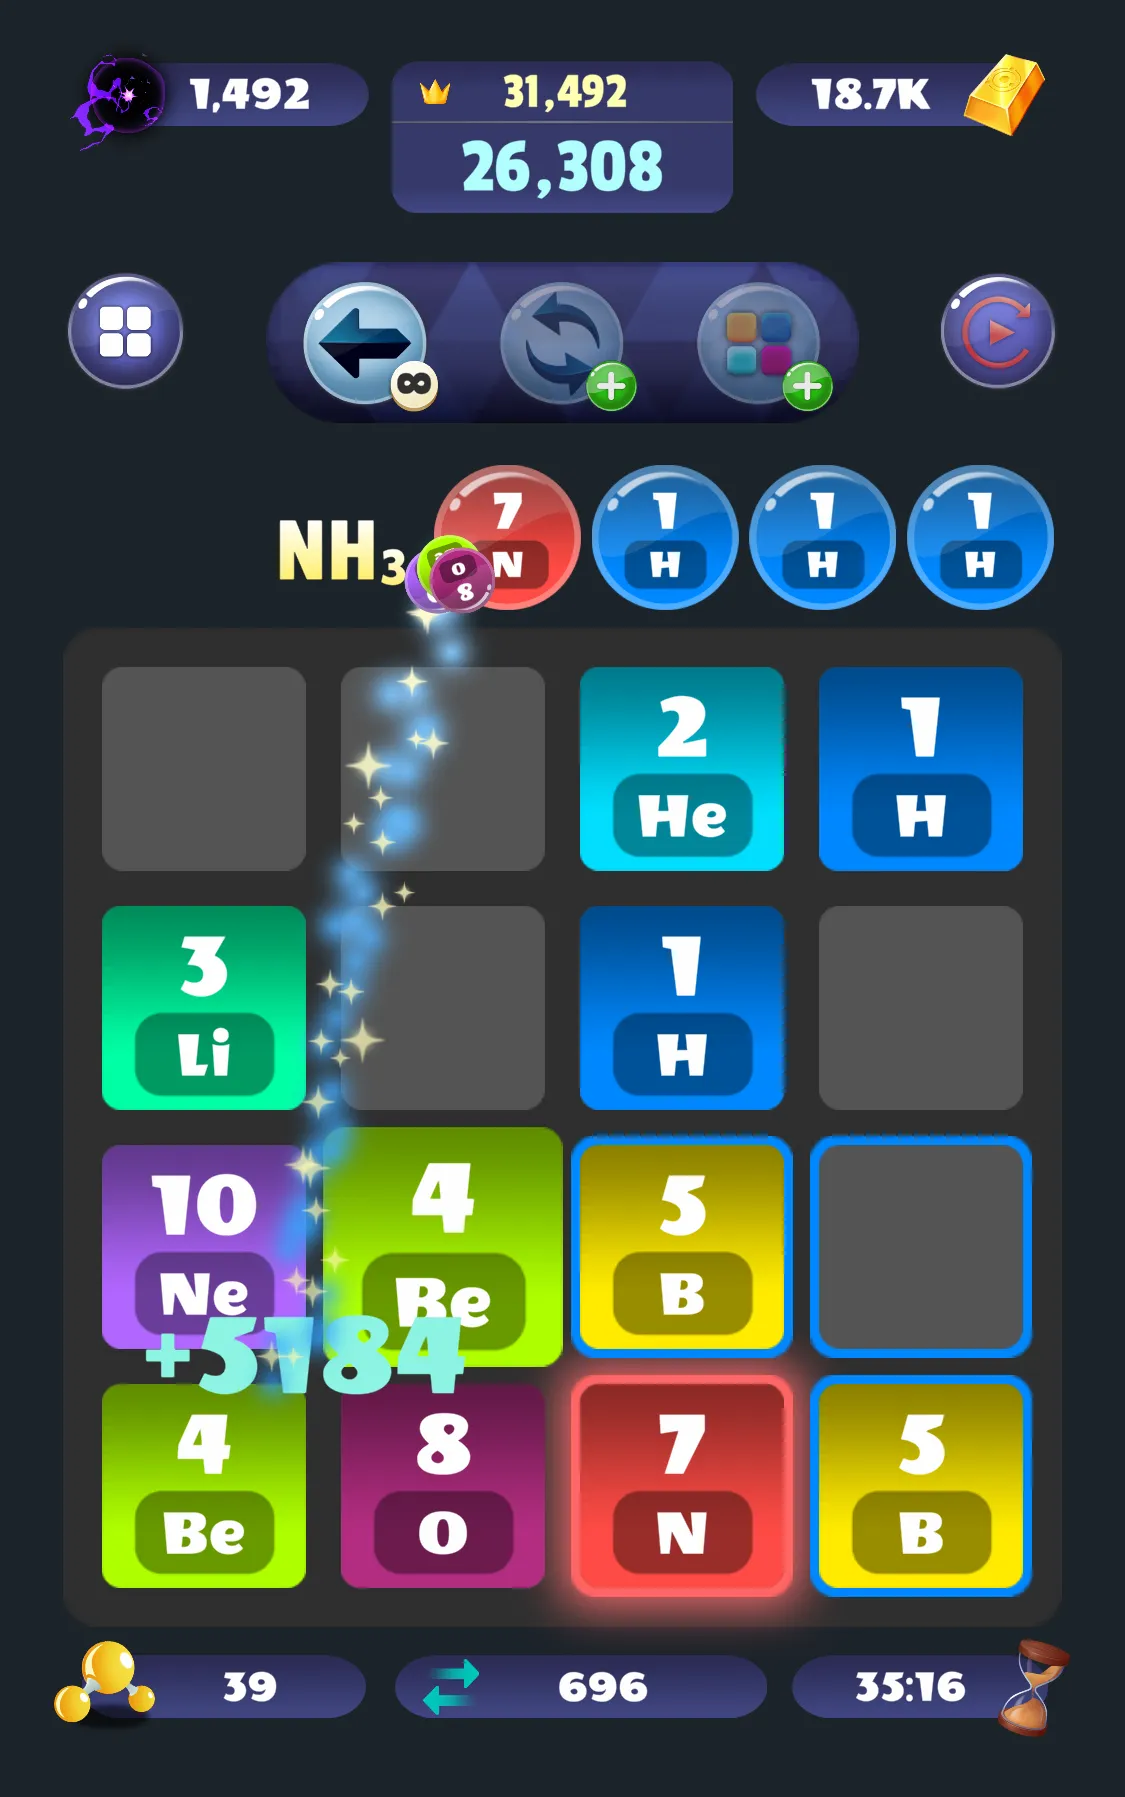
Atomic Tiles is a slide puzzle game featuring an atomic and chemical theme. Atoms of the same value or type can be merged by sliding them in the same direction to create larger ones. During gameplay, molecule missions appear, requiring users to place corresponding atoms in the correct positions. The main goal is unlocking all molecules, creating the largest atom possible, and beating your high score.
The idea of this game started a few years back, inspired from puzzle games like Threes!, 1024, or 2048, but with a personal touch, involving atoms, molecules, and other mechanics (though not aiming for scientific accuracy). Before starting developing the game, in 2017, I coded a basic but playable 2048-demo over a weekend on a C++ console project using SFML/OpenGL:
A few years later, I decided to expand a bit on it and I implemented the logic in UE4, using slates and UMG for the interface and game graphics, adding atoms and the chore mechanics.
I would like to showcase a few code snippets of the features that I added on top of
the base game and show how the basic mechanics were handled.
Picture a 4x4 board, where each of the 16 tiles holds a value and other
parameters, representing the board's current state, all stored in a struct
(
FTileState
):
| |
The
FTileState
keeps track of key parameters to maintain the tile's complete state.
A
Value
of 0 signals an empty tile, while other values correspond to the atomic value of the
tile
(Hydrogen for 1, Helium for 2, and so on). The
HasMerged
boolean indicates whether the tile has
already merged with another of the same value, which is important to ensure
only one merge per tile per move.
The
Locked
boolean brought in a new mechanic I implemented: it's aimed at placing specific
tiles
(or atoms) in the right spots to complete molecule missions within the 4x4 board.
Once the atoms are correctly positioned, they lock in place until all the
atoms needed for the current molecule are
placed. Lastly, we've got the origin and destination vectors, which track the
current and target positions for animating the tiles during a swipe action.
When a new game starts, all the tile states on the board are reset:
| |
In this snippet, the function
ResetBoard()
essentially wipes the slate clean, preparing the game board for a fresh start.
First off, it calls
Tiles.Reset()
, which clears out any existing board data and deallocates the
memory associated with the previously
stored structs. This ensures that the memory previously used by the
game board elements is properly released,
preventing any potential memory issues.
Then, it jumps into setting up a new 4x4 grid. We initialize the tiles using loops
that traverse each row and column.
For every position on the grid, a
FTileState
struct is created with initial values. Once all tiles are set up, they're
added to the tiles array, effectively reconstructing the game board from scratch.
For spawning atoms, we select a random empty tile on the board and spawn an atom of value 1 (90% chance) or a value 2 (10% chance):
| |
This function initializes an empty array
EmptyPositions
to store potential spawning locations. Then, it iterates
over the entire game board to identify vacant positions by checking if
the tile's value at that position is zero.
Any found empty spots are added to the
EmptyPositions
array. If there are available empty positions,
a random one is selected, and a new tile is spawned with a value of either
1 or 2, determined by a 90-10 chance ratio.
If the newly spawned tile's value surpasses the current
LargestTile
value,
it updates the latter. Lastly,
the position of the spawned tile is recorded in the
SpawnPositions
list. If no empty positions are
found on the board, the function exits without spawning a new tile.
In hindsight, using an array (
EmptyPositions
) wasn't the most efficient approach. This could be easily done without taking any
extra memory (which is what I did in the final version) simply by
checking the tile value and only
interacting with zero values.
Later on, I added molecules to the gameplay. For game data structures, I initially used JSON (because I like its compatibility with other projects from different frameworks or engines):
| |
However, in the end I opted to make use of Unreal's Data Tables
since their serialization/deserialization is pretty fast (it uses
binary) and Data Tables also work out of the box in build projects
since their data is easily accessible from the
.pak
files.
At the beginning of the game, this data is retrieved and read, and then transformed
into
TArrays
/
TStaticArray
and
TMap
. An array of molecules is useful when order matters, such as when displaying the
list of
molecules in a scroll rect to show progress. I use
TMap
(a dictionary/key-value pair)
to keep track of the molecules that are completed. It's quite handy for fast
look-ups
since it's an O(1) operation, no matter how big the dictionary gets. For the early
prototype, I reached this point but didn't go further.
Recently (early 2024), I dusted it off and expanded on it by adding molecule missions, daily challenges, unlocking of elements for progression, and other cool features. Since I developed optimized and reusable modules in C# in the past, I decided to continue in Unity to speed up the development process. These modules include billing services, communication with native devices (for leaderboards, achievements, date & time picker, native notifications, etc.), native cloud services, and more.
CLOUD SAVE & LOAD (iCloud & Google Play API)
The game has a local save/load system and also integrates with cloud services for both Apple and Android devices. This allows you to maintain your progress across different devices. I designed it so that you have the choice to either update to the latest (most advanced) version of your game or start a new local game separate from the cloud. This way, you can decide whether to keep both devices synchronized at all times or maintain a different game on each device.
Here's an example of starting the game fresh after downloading by rejecting the update:
Similarly, when launching the game and detecting a newer version, you'll have the option to update it (and even continue from a game that is started):
LEADERBOARD (Native Game Services)
A leaderboard that ranks the best scores for each player:
ACHIEVEMENTS (Native Game Services)
A list of achievements integrated with the native services system:
DAILY CHALLENGES
The Daily Challenge system uses UTC (Universal Time) to track dates and determine when a new day begins. This approach eliminates discrepancies in local time zones. The local date from the device's system is retrieved and then converted to UTC for consistency.
| |
The most secure and reliable way to detect a new day and prevent date manipulation would be to use a server-side date verification. However, for less complex scenarios, using UTC is good enough, as it accounts for time zone differences, changes in the system clock, and other potential tricks.
NATIVE NOTIFICATIONS
Native notifications are used for various functions, from confirming actions like starting a new game (preventing accidental clicks) to alerting users when they lack enough currency to make a purchase or displaying important messages.
Here's a quick example of how it works:
| |
The
NativeNotification
class is a wrapper designed to handle platform-specific communication
by bridging C# with native code for both iOS (Objective-C/Swift) and Android
(Java/Kotlin).
The title, body, and button text is prepared using the appropriate
locale settings based on user preferences, then displays the alert message.
REWARDED ADS FOR POWER-UPS
Since this recording was made using the final version, I wasn't able to demonstrate the ad popup directly (developers are not allowed to interact with ads). However, you can see that players have the option to obtain the power-up either by spending in-game currency (dark matter) or by watching an optional ad.
IN-APP PURCHASES
I developed this feature using Unity's IAP. In-app currency can be obtained either by playing the game or by making a purchase. The clip below shows how a transaction is canceled and how players are informed. The In-App Purchases feature is supported on both iOS (with the required restore button) and Android.
PROGRESSION
Players can buy new molecules using in-app currency, and their progress is tracked in the 'stats' tab. To make sure the game runs smoothly, I used an object pool to manage how items are displayed in the Scroll Rect.
During testing, I added over 10,000 items using Unity's native Scroll Rect, and the FPS took a huge hit. With object pooling, only the items visible on the viewport are actually instantiated (about 12 prefabs at a time on an 20:9 display). As players scroll, the items get updated with the right information, keeping the FPS stable no matter how many items are in the game: there's virtually no difference between having 200 items or 20,000,000.
The goal was to have the game running at 60 FPS on low-end mobile devices while minimizing computation and rendering work to preserve battery life and reduce heat. I achieved a smooth 60 FPS on low-end devices (tested on 6 low-end Android phones) throughout the application by following good coding practices, reducing draw calls and set pass calls, sharing materials, avoiding excessive use of shaders, and optimizing rendering performance.
One way to ensure the game performs as expected is by using proper instrumentation tools to monitor the performance across different areas. In Unity, you often see yourself using the Profiling, Frame Debugger, and Memory Snapshot tools. Ideally, profiling should be done during periods of maximum activity to ensure the game never exceeds the allocated 16 ms per frame (for 60 FPS).
| Rendering & Draw Call Optimization | |
| UI Optimization (Unity Canvas) | |
| Memory Management | |
| Script & Update Loop Optimization |
Rendering & Draw Call Optimization
Draw calls are commands sent to the GPU to render objects. Each call has overhead, especially on low-end GPUs with limited bandwidth. Too many calls fragment rendering workloads, increasing frame times and battery drain.
To reduce draw calls, I employed Sprite Atlases, batching, and material sharing. Initially, the game had ~90 draw calls and 12 set pass calls. According to Unreal (2024), mobile draw call recommendations range from 50-500 depending on the hardware:
Draw calls are lookups for assets, which happen every frame. The number of draw calls your application uses depends on the number of unique meshes in your scene, as well as the number of unique material IDs each mesh is using. Currently, a high number of draw calls are the biggest contributor to low graphical performance, and you should reduce them as much as possible.
As an example, a highly optimized car model might only have five or six separate meshes, and each one of those components might only have a single material.
A good target for draw calls in an optimized scene is roughly 700 on a Galaxy Tab S6, and less than 500 on lower-end hardware. In projects for HMI, which tend to use highly unique or complex materials, 100 draw calls would be a good target on a Galaxy Tab S6, while less than 50 would be preferable.
The game ran decently on most low-end devices, except for the worst-performing one, which struggled to stabilize at 60 FPS. The way I bumped the framerate up was by reducing draw calls, set pass calls, and replacing Unity's URP.
Regarding draw calls, reducing them may seem straightforward, but requires targeted effort. I had to flatten nested structures in the canvas that otherwise, even when sharing the same materials, would break into different draw calls due to their position in the hierarchy. Additionally, all the UI assets from the main scene were placed into a single Sprite Atlas so that they share the same material and therefore could be drawn in a single call.
Figures 1 to 5 show the 11 draw calls that comprise the main/game scene using the Frame Debugger tool:
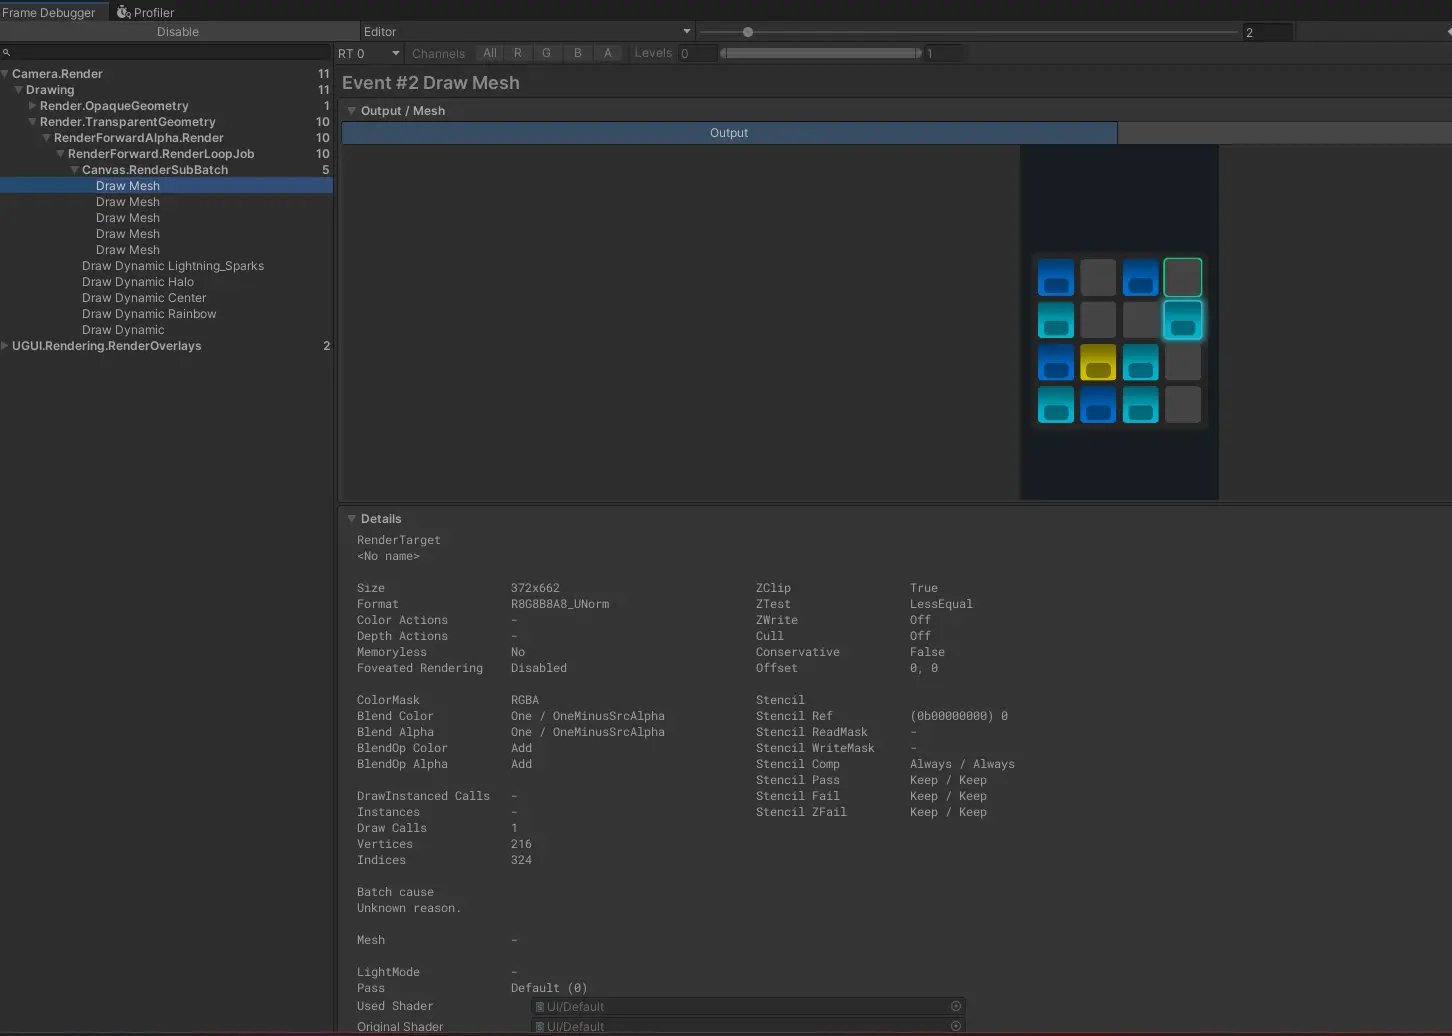
Figure 1. The first draw call renders the main board and tiles. They are drawn separately because they belong to a separate canvas and hierarchy.
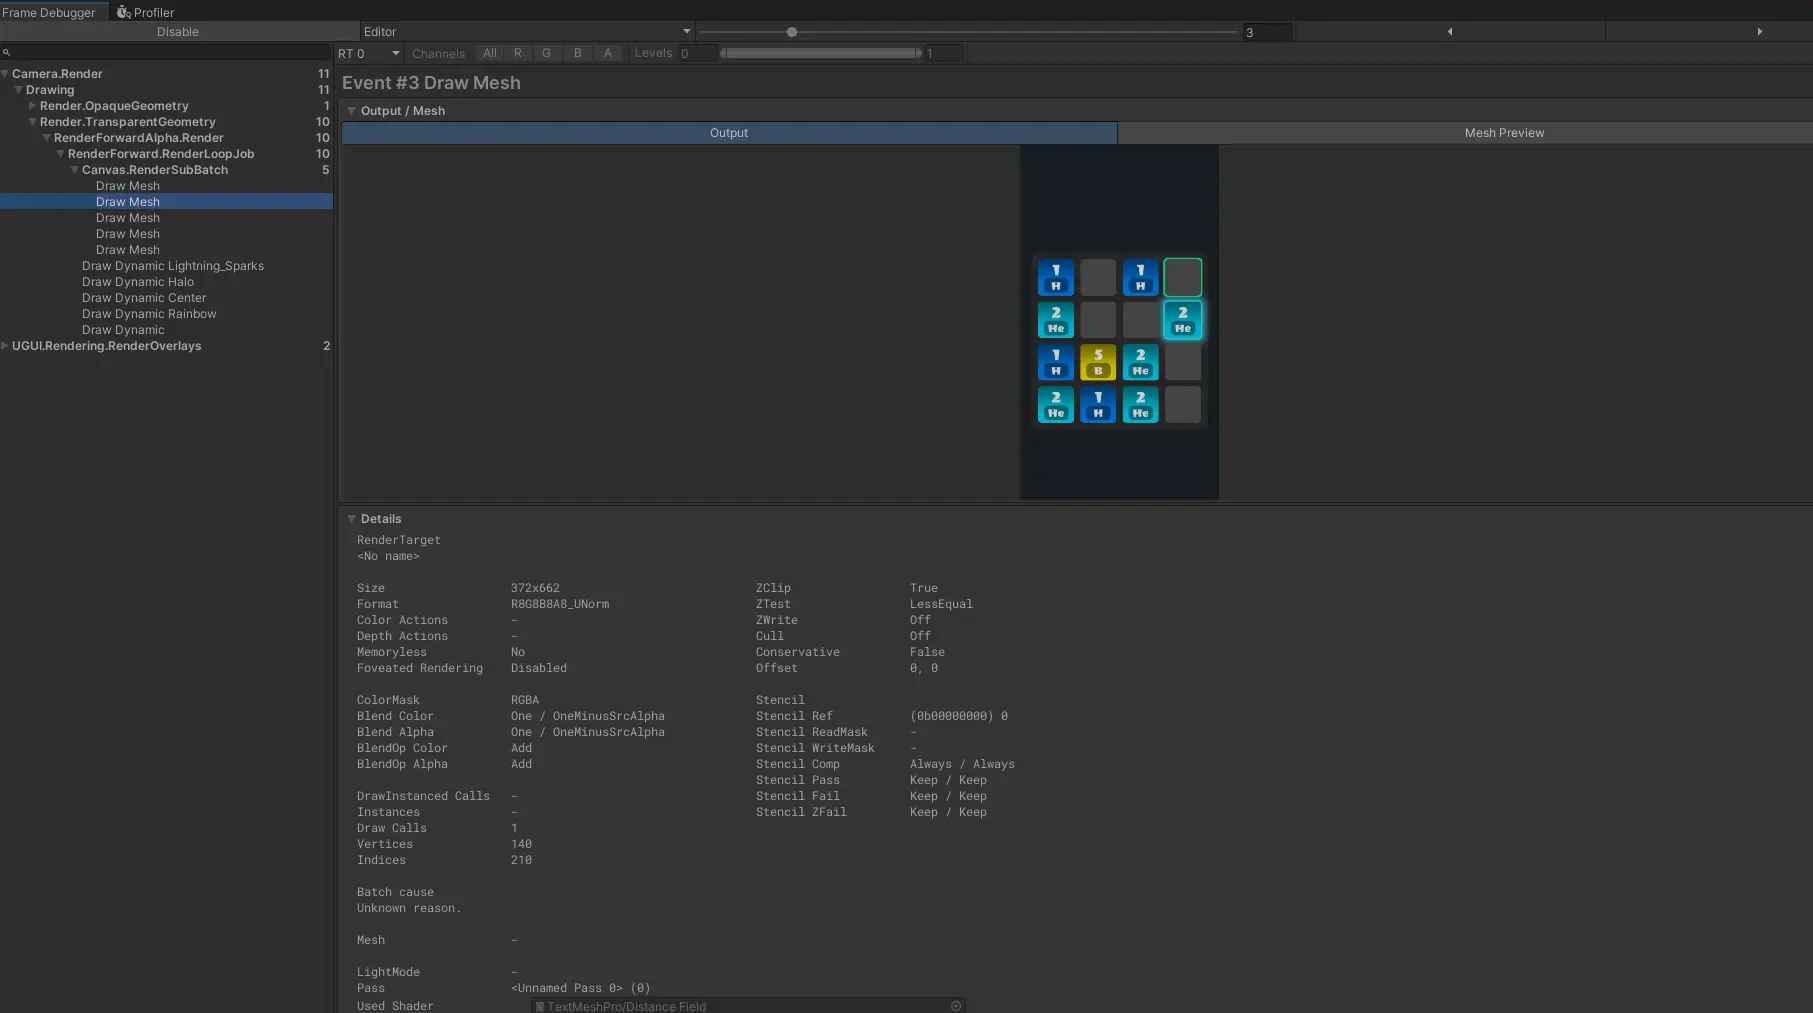
Figure 2. The second draw call renders text elements that belong to the same canvas as the first one. They need a different draw call because the text font uses its own unique material.
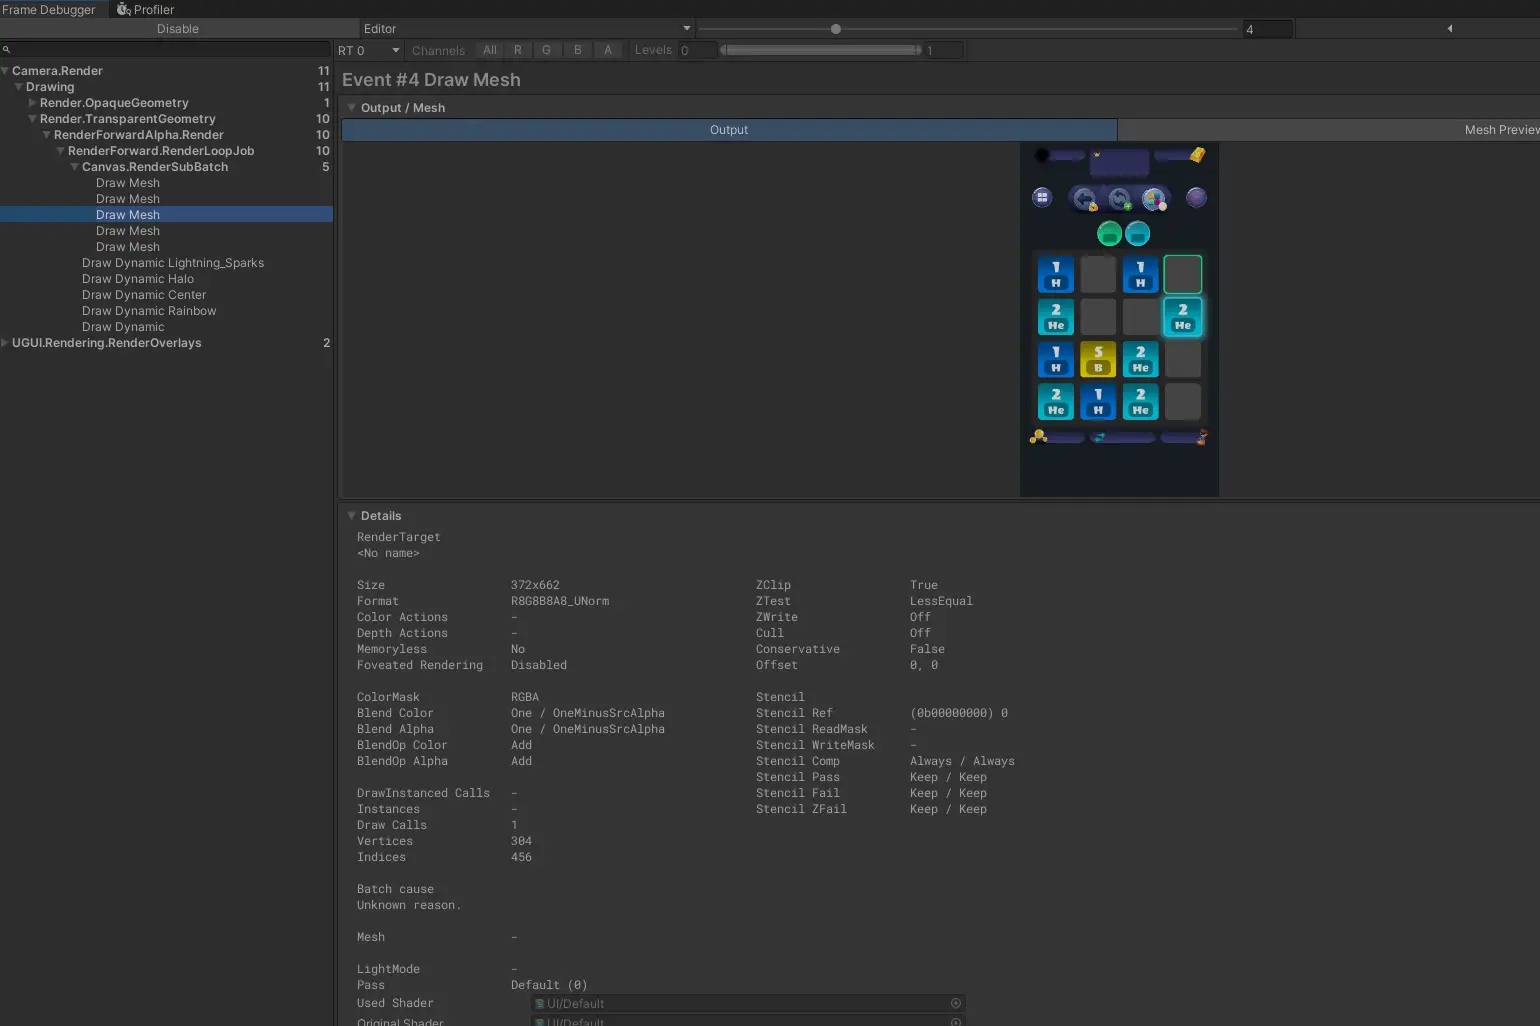
Figure 3. The third draw call groups UI elements using the same Sprite Atlas.
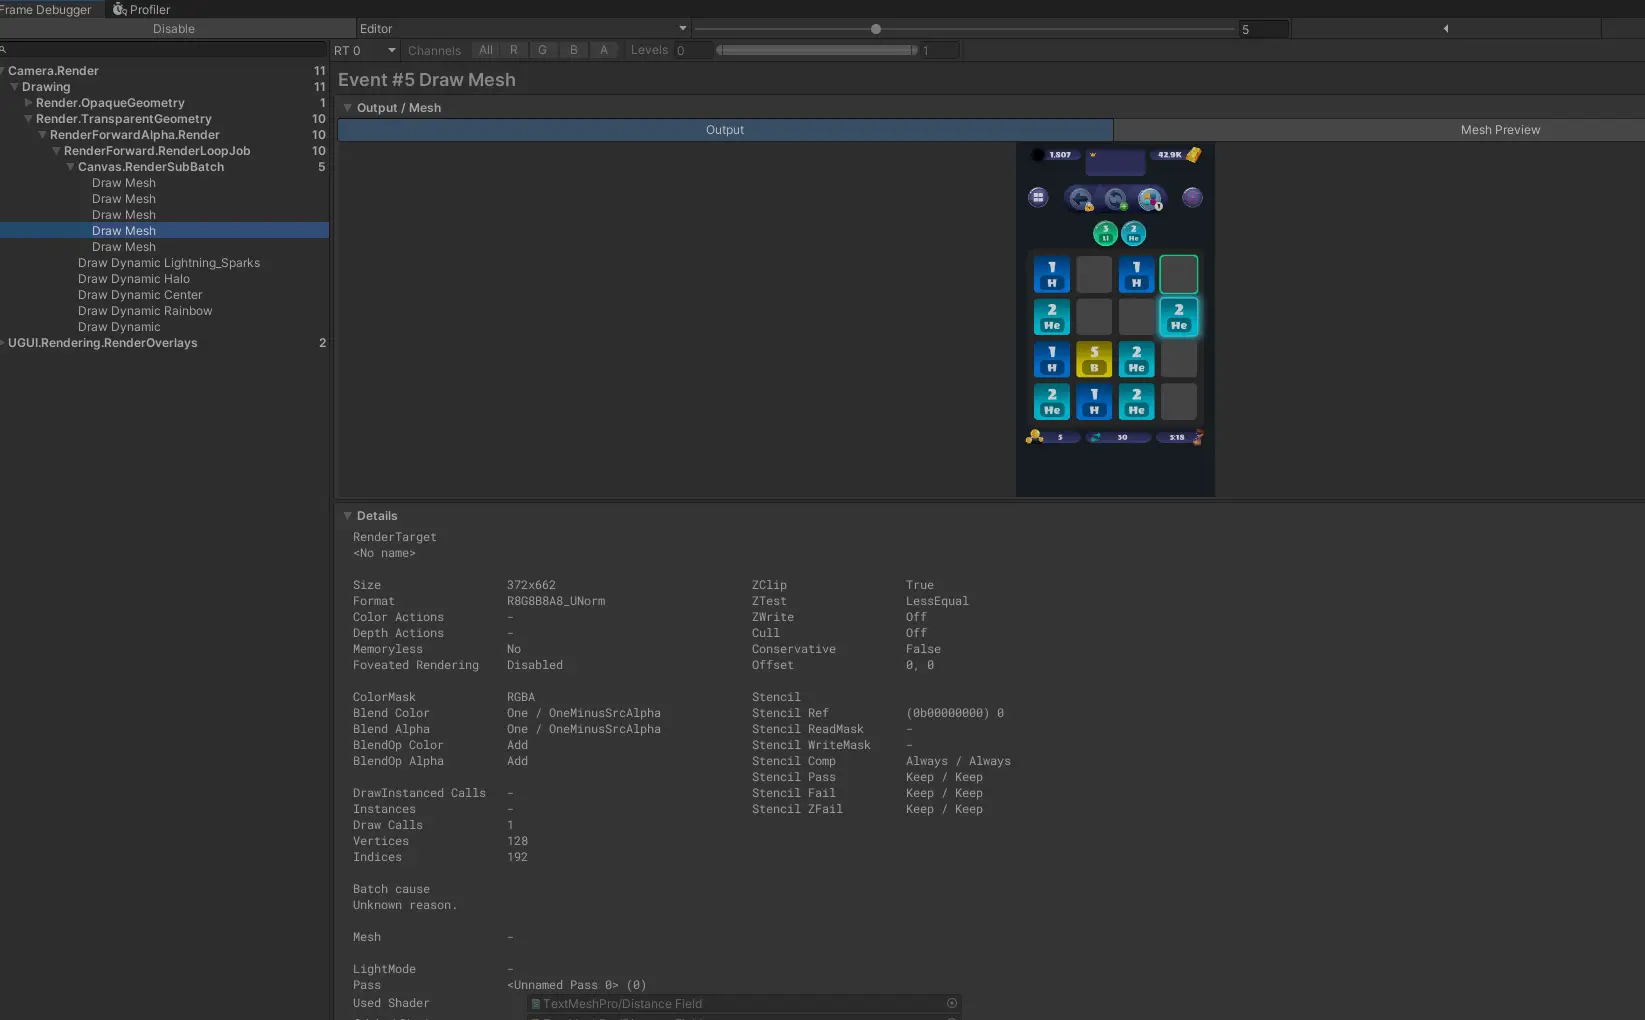
Figure 4. The fourth call renders UI text using its own font material
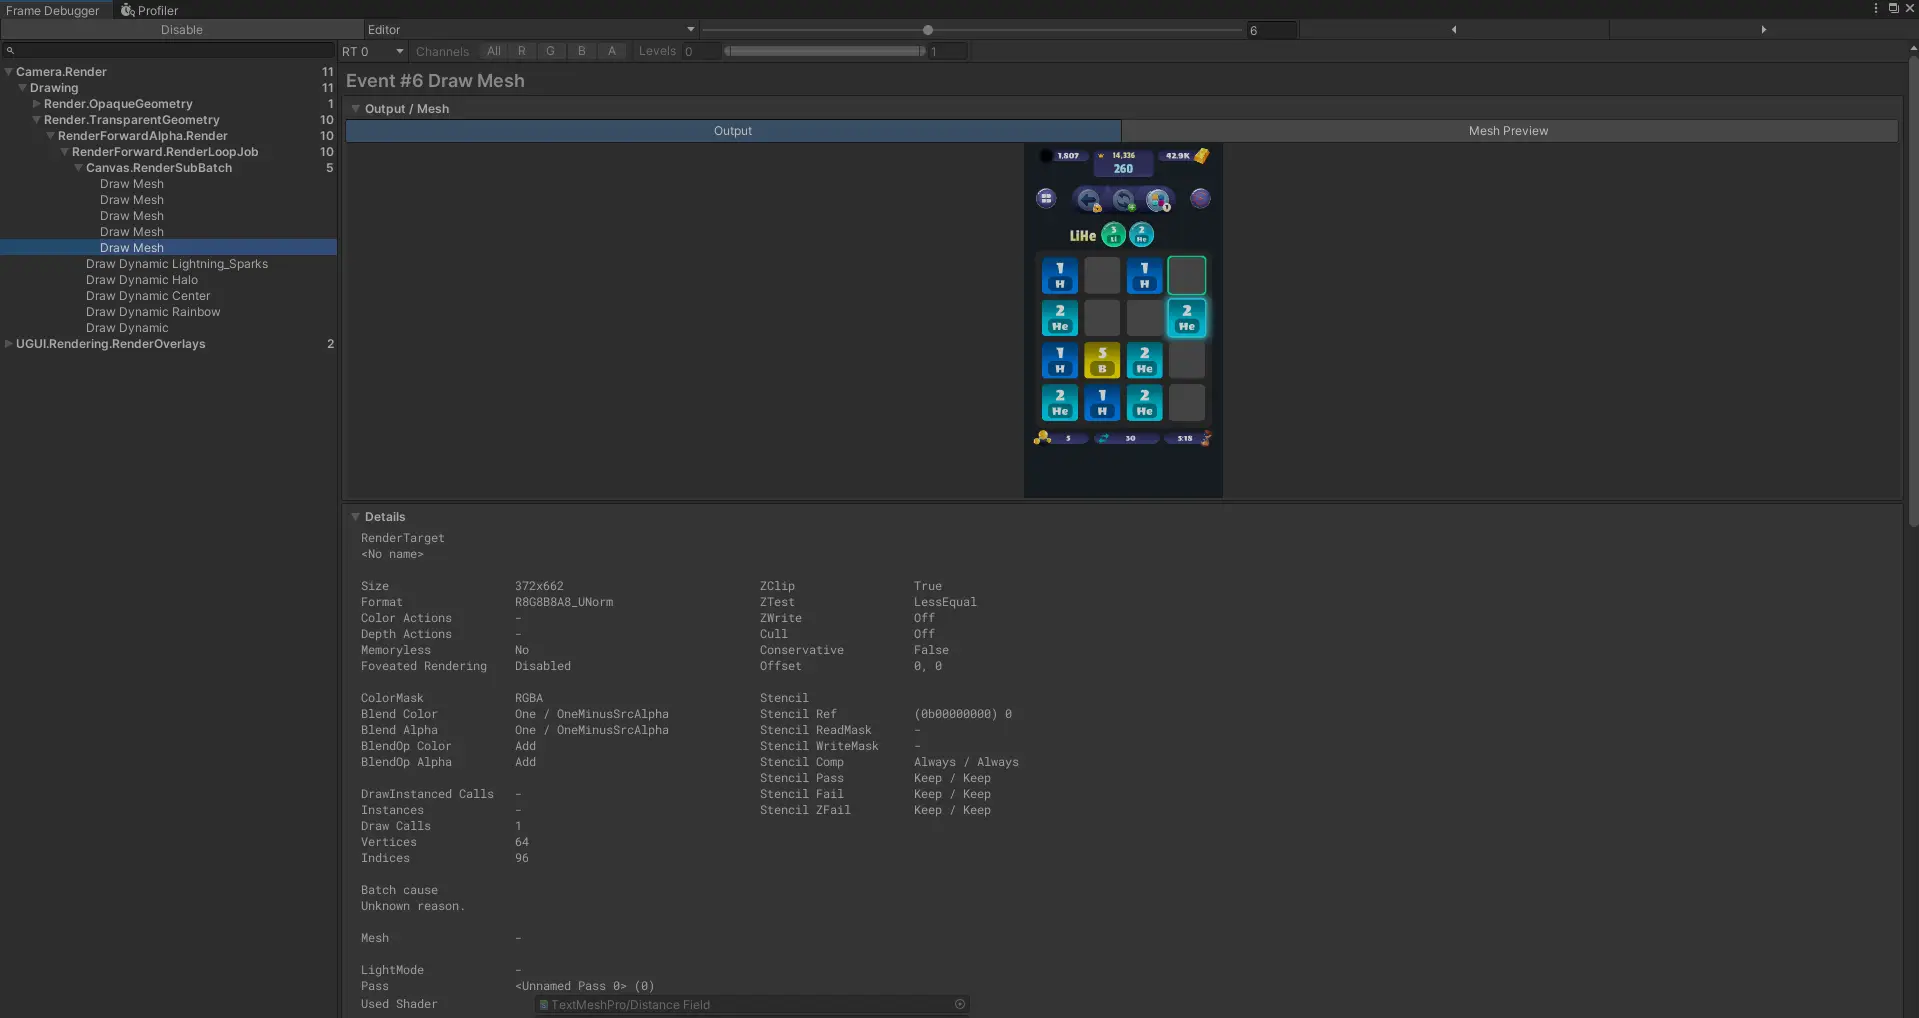
Figure 5. The fifth draw call renders the score text, which uses a different font asset due to a stylistic choice.
The remaining draw calls come from an animated asset (the one in the upper-left corner) using multiple materials, correlating with the total set pass calls in the scene.
Regarding Unity's default Universal Rendering Pipeline, I was using it for a post-process glow effect that highlights molecules that are locked in the correct place, giving a visual cue to players. While this worked well on most test devices, simply enabling URP in an empty scene, without any post-processing effects, added 4-5 ms per frame to the rendering time on low-end phones. This is a significant overhead (over 25% of the frame budget), especially as it's a constant cost, even during idle periods. This overhead can push the total frame time above 16 ms (even by a tiny margin, e.g., to 16.5 or 17 ms), resulting in a drop from 60 FPS to 30 FPS on mobile devices, as there's no intermediate frame rate.
Since URP was only needed for the glow effect, I came upon using a cheaper and, perhaps, clever alternative that allowed me to get rid of URP altogether. In the picture below, you can see that, even though there are some visual differences, the highlighting effect is robust in both cases:
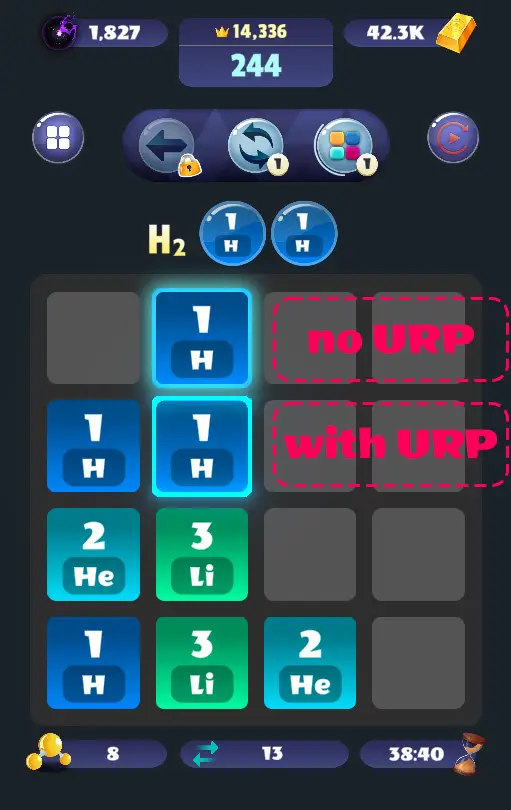
The URP rendering pipeline (default settings) was perfectly fine and usable for most devices, but removing it gave the extra edge needed for the low-end devices. The result was the game running at 60 FPS (lowering the MS Time by 4) on the six lower-end test devices.
UI Optimization (Unity Canvas)
In Unity, a canvas is more than a container, it's a batching system. When a canvas updates, it recalculates and redraws all of its children elements, even if only a single UI element has changed. If the entire UI is placed within a single Canvas, even a small update (e.g., updating the score text) can trigger a full UI rebuild, potentially taking more than 3 ms (depending on the complexity and extension of the canvas), which is a significant portion of the 16 ms frame budget.
This is very different from how Unreal Engine's canvases work. In fact, is quite the opposite, and this is why it's important to know your environment and the tools you use if you want to get the maximum performance, or at least avoid common mistakes.
Here's a nice summary of UE's Canvas:
Canvas Panels also have high performance demands. Draw calls in Slate are grouped by widgets' Layer IDs. Other container widgets, such as Vertical or Horizontal Boxes, consolidate their child widgets' Layer IDs, thus reducing the number of draw calls. However, Canvas Panels increment their child widgets' IDs so they can render on top of one another if need be. This results in Canvas Panels using multiple draw calls, thus making them highly CPU-intensive compared with alternatives.
Overlay panels also increment their Layer IDs, and therefore also use multiple draw calls. These are less likely to have the same impact as Canvas panels due to the more limited scope that they are used in by comparison, but keep this in mind when using Overlays as well.
Using one Canvas Panel to lay out the root widget for a HUD or menu system should not be a problem, as these are instances when you would most likely need detailed positioning or complex Z-ordering. However, you should avoid using them to lay out individual custom widgets like text boxes, custom buttons, or other templated elements. This results in nesting Canvas Panels multiple layers deep throughout many elements in your UI, which is extremely resource-intensive. Furthermore, excessive use of Canvas Panels in multiple layers can make it confusing to discern which layer of your UI is responsible for determining part of the final layout.
As a rule of thumb, if your widget consists of a single element, you definitely do not need a Canvas Panel. Even with full menus and HUDs, you can often avoid using Canvas Panels altogether by using Overlays and Size Boxes together with Horizontal, Vertical, and Grid Boxes to handle layouts.
In UE, you have at most one canvas to avoid unnecessary draw calls. You'll use overlays, size boxes, or other cheap panels to composite your UI within a single canvas.
In Unity, instead of having a single large Canvas containing all UI elements, it's better to split UI elements into multiple canvases. It's best to split them based on the distinction of static and dynamic elements. UI Elements that update often should have their own canvas to avoid triggering costly rebuilds on static canvases.
I also avoided using too many Layout Groups and Content Size Fitters because these UI elements are well known for being computationally expensive and causing rebuilds. For instance, if I have a localized text that may vary in length (in different locales) but is otherwise static, I'll precompute layout calculations on load or only trigger them when a locale change is detected.
Memory Management
Unity uses C#'s managed memory system, meaning objects are automatically allocated
and freed using Garbage Collection (GC). However, GC spikes can cause noticeable
frame drops, making the game feel sluggish. This is because most GC systems run
unpredictably (unless you call
GC.Collect
manually), pausing the execution to free memory when needed. For instance, we want to
avoid the following:

Unfortunately, C# doesn't offer the complete control over memory that you'd expect from C or C++, so a common way to reduce GC spikes is to simply avoid frequent memory allocations. Main contributors to garbage creation are object instantiation and destruction, extensive string manipulation, boxing/unboxing value types, creation of lambdas or anonymous methods, among others. For instance, I used pools extensively to avoid unnecessary object instantiation and destruction. In C++, I often use my C++ string class that is meant to avoid allocations altogether when manipulating strings. In Unity, it's more complicated because you have to deal with the limitations of .NET when it comes to handling memory. Fortunately, there are libraries available in Unity aimed at reducing memory allocations when dealing with string interpolations, such as StringBuilder, ZString, or StringMaker.
For context, an empty Unity project (Unity 2022) uses nearly 170 MB of runtime/RAM memory:
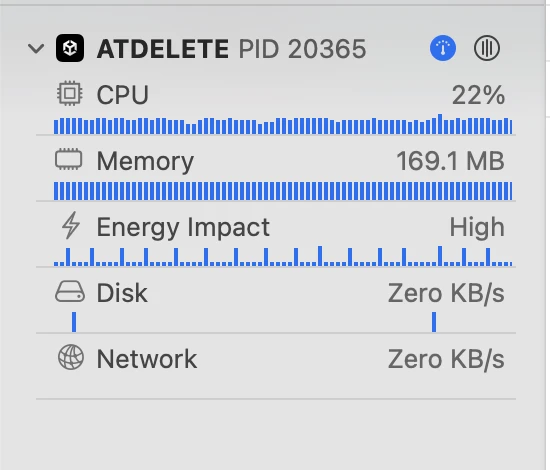
Adding only Ads SDK, Unity IAP and Game Services modules increases usage by 30 MB (200 MB total), so the baseline is quite high for a project with no content whatsoever, although it still remains more lightweight than a UE4 empty project. Nonetheless, for most modern devices, this is not a problem, and sometimes the tools Unity offers that facilitates and speed up development can outweigh the extra memory and overall overhead that the engine implies.
In this project, the total runtime memory footprint was 40–60 MB: this includes all
instantiated objects in the scene, 2D textures, assets, scripts, etc. I kept it
low by managing scenes properly and freeing unused assets
(e.g.,
Resources.UnloadUnusedAssets();
) at key times in runtime when they are no longer needed.
Script & Update Loop Optimization
Optimizing the script execution in a 2D game may seem secondary compared to rendering optimizations like draw calls or memory management. However, inefficient scripting can silently introduce performance bottlenecks, leading to unnecessary CPU usage, sluggish input handling, and reduced battery life on mobile devices.
The
Update()
method in Unity is often overused. Since it runs once per frame, that frequency is
unnecessary for many game mechanics. Instead, an event-driven approach ensures that
logic only executes when absolutely needed. For example, you'll probably handle
UI hook-ups like this, rather than constantly polling inside Update():
| |
Unity's new Input System follows this event-driven principle. Communication
between different modules also benefit from event systems, e.g., with
delegates (in UE I often see myself using non-dynamic delegates, such as
DECLARE_MULTICAST_DELEGATE
,
DECLARE_MULTICAST_DELEGATE_OneParam
, etc.), or Unity events. For example:
| |
Another obvious yet important aspect is caching references and avoiding unnecessary runtime
lookups. Calls like
GameObject.Find()
,
GetComponent<T>()
,
FindObjectOfType<T>()
can be expensive when used frequently, , so caching them whenever possible
improves performance.
Expensive computations inside loops (especially in nested loops) or polling operations can also create bottlenecks. It's important to minimize them or optimize them when needed. In this particular game, there wasn't need for deep nested loops and I avoided polling altogether by relying on an event-driven system. For instance, animations are triggered and stopped via events, and they run in async tasks that exist for the duration of the animation and not more. In a more complex scenario where deep nested loops could arise (like in GymApp, another app that I developed), I would consider using a greedy algorithm or another optimized approach to reduce computational complexity.
Finally, operations like
Instantiate()
and
Destroy()
are costly, not just because of the garbage generated that will eventually
need to be cleaned up by the GC, but also because they involve heap memory
allocations, which takes much longer than simple stack allocations, incurring an
upfront cost. Instead, an object pooling system can recycle already created
objects (that you instantiate at the start of the game or the scene), so you avoid
allocations altogether. Naturally, a game like this involves 'creating' and 'destroying'
tiles all the time, but what happens under the hood is having only 16 tiles (on a
4x4 board) instantiated at the start of the game, and reused throughout the lifetime
of the application/game scene.
To summarize, achieving optimal performance, especially on low- to mid-end mobile
devices, requires a combination of careful scripting, efficient memory management,
and rendering optimizations. By minimizing
Update()
usage, caching references, and using event-driven patterns we reduce unnecessary CPU
workload. Optimizing loops, minimizing heap allocations and reducing garbage
generation help maintain smooth performance without unexpected frame drops.
On the GPU side, minimizing rendering work by batching draw calls, reducing overdraw
(especially in UI elements), and eliminating unnecessary UI
redraws ensures efficient graphics processing.
When all these elements work together, the result is a responsive and fast application
across a wide range of hardware.