
| Platform: | iOS (App Store), Android (Google Play Store), PC (Windows/Mac) |
| Engine: | Unity |
| Language: | C# |
| Tools Used: | Visual Studio, Photoshop, Audition, After Effects, Adobe XD |
| Duration: | 5 months |
| Completion: | 2023 |
| Role: | Concept development, gameplay programming, graphic design, SFX programming, UI development, testing, debugging, ads/in-app purchases programming, and publishing |


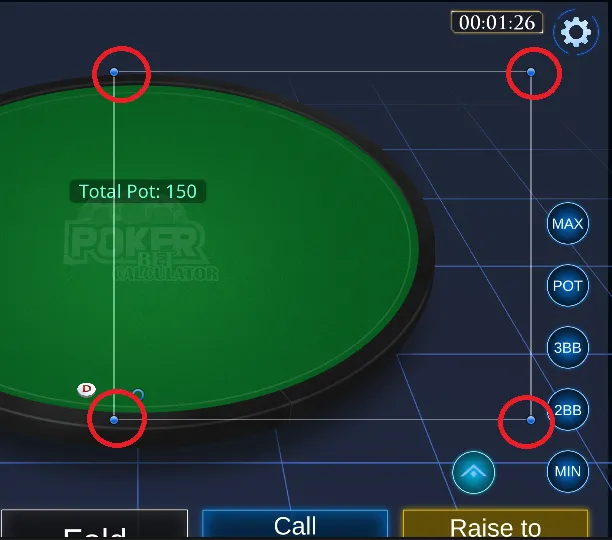
Poker Chip Counter is a tool that takes care of all calculations of a Hold'em poker tournament. The concept for this project stemmed from the idea of playing with friends and not having to do the maths behind bets, pots, and side pots, or knowing/remembering all the betting rules. Also, it provides a user interface and game board to track of everyone's chip stacks, timers, and blind levels.
The app was initially developed for single-user management of the tournament. You could input all the players, assign their chips, and set up other tournament details. The app could be displayed on a larger screen for everyone to view stats like chip stacks, timers, blinds, and more. Alternatively, the app holder could act as a dealer, announcing the game stats and betting information.
After completing this phase, I integrated a multiplayer feature. Now, players with the app can connect locally, share live stats on their devices, and perform actions independently, ensuring real-time updates for all connected players.
To do so, a host/server setup was implemented for client connections. Communication between apps is managed via Server RPC and Client RPC. For example, the following code demonstrates a typical network interaction:
| |
Here,
[ServerRpc(RequireOwnership = false)]
allows any client to perform the 'fold' action and inform others.
Without
RequireOwnership = false
, only the host could execute
[ServerRpc]
functions.
Once a player initiates
Fold_ServerRpc
, the
Fold_ClientRpc
function synchronizes this action across all devices.
In the GIF above, when Vin folds,
the
playerBoxShadowArray
is enabled, and the corresponding SFX is triggered.
Naturally this behavior, along with the updated player information, is communicated across all devices.
All stats are stored in a Scriptable Object, making the different components of the app
and their communication modular and independent.
One of the initial networking challenges was the transfer of game data. When players join, the host needs to share the tournament setup and info with them. At the start, this is manageable with simple parameters being passed in within a function.
| |
However, this approach becomes impractical and unsustainable for larger data sets, such as those required when a player rejoins a game mid-session. In these scenarios, the data set involves a vast number of parameters, and it also includes complex data types like arrays, lists, or dictionaries.
To handle this, I implemented serialization/deserialization with
INetworkSerializable
structs for efficient data transfer.
For instance, the following is an example of a struct that handles simple data types:
| |
The first thing to do is to provide the parameters we want to expose to the serializer. The
NetworkSerialize
method uses a
BufferSerializer<T>
object to handle the actual serialization process. The
SerializeValue
here is used to convert each field of the struct into a format suitable for network transmission.
Complex types required a different approach, as shown in the following array serialization example:
| |
First, when the serializer is not in 'reader' mode, we initialize the arrays' length
to fixed values predefined in the game database. This initialization is
important as it standardizes the array sizes for consistent
serialization/deserialization processes. We then use
serializer.SerializeValue
to serialize the length of these arrays,
ensuring that the receiving end knows exactly how much data to expect.
Next, I handled the deserialization process within the
if (serializer.IsReader)
block. This segment is designed to
set up the necessary data structures for incoming data. It prepares the environment
to correctly interpret and allocate
the data being received from the network.
The final part of the process is handled within
for
loops. The operation within these loops depends on the serializer's
current mode. In 'writer' mode, each element of the arrays is serialized
and sent over the network. Conversely, in 'reader' mode, the incoming data from
the network is deserialized and stored into the arrays. This dual functionality
ensures that data can be accurately transmitted in both directions across the network.
With our data now correctly structured for network transmission,
the process of handling client reconnections becomes
streamlined. Upon reconnection, a client identifies itself to the server using its
ulong clientId
. This identification
enables the server/host to execute a specific function designed to update the struct
parameters. These parameters are then
set to match the current values held on the server side,
ensuring that the client's state is synchronized with the server:
| |
After completing the update of all relevant values, the system initiates the process
of synchronizing the client's state with
the server. This synchronization starts with the preparation of a
[ClientRPC]
call. We use targeted
clientRpcParams
, specifically the
clientId
provided during the reconnection phase, to ensure that the message is directed to the correct client.
We then invoke the
UpdateNetworkVariables_ClientRpc
function, which is designed to be executed on the client's side to perform
the inverse of the server-side operation: updating the client's game stats with the
latest values received from the server. This
ensures that the client's game state is in full alignment with the server's data.
| |
With the client's data now fully updated, I trigger an event via a Scriptable Object to signal this update. Both the Game Manager and the UI Manager independently hook up to this event, updating their respective elements and variables. This process ensures that, upon scene loading, all UI elements accurately reflect the current game state, maintaining synchronization with other players in the network.
In the GIF above, 'Player' has placed a bet of 1,129 chips (a raise of 1,079 chips) while 'Player2' was disconnected. During this period, Player's turn timers, as well as tournament and blind timers, were actively counting down. Upon 'Player2's reconnection, the system effectively updated and synchronized all this critical info. This system showcases the update process, ensuring that reconnected players receive an accurate representation of the game state immediately after reestablishing the connection. This includes the latest bets, current pot, side pots and timer states, and other relevant information.
The app follows an Event-Driven architecture where actions trigger specific events, and various game components react accordingly. My primary goal was to establish a clear-cut separation of the game's multiple components, such as game logic, visuals/graphics, UI, sound effects, etc. This approach allows for a clean and modular design, where different parts of the game interact independently without needing direct knowledge of each other.
I'll showcase this with a few examples.
Round Initiation and Betting Mechanics
At the beginning of each round, players holding blinds automatically bet the corresponding bet amounts. It uses a coroutine that adds a small delay in the sequence of events for a visual representation. For instance, when the small blind bet is placed, there's a 0.2s delay before the big blind bet follows:
| |
The
Bet_SmallBlind
coroutine adds a small delay (for visual purposes) and processes the small blind
value for a given player based on their current stack. This information is then communicated via an event
request through a scriptable object that manages events. In the Scriptable Object, events are handled
using
UnityActions
(although delegates or any other event system would be fine too):
| |
In this case, the Bet Manager script calls the event on the Scriptable Object that handles event requests, and the UI Manager script hooks up to this event, so it will update the UI information appropriately every time a bet is placed. This is the case for most scripts: they don't need to know about each other; instead, they handle only what they are supposed to and only then send a 'message' to inform other components which can listen if they are interested.
Player Turn Management and Coroutine States
I also made use of coroutines to manage players' turns. Depending on the stage phase and the Blind position, the correct player in a Texas Hold'em tournament is given the turn. The turn timer uses a coroutine that ticks down the player's clock. Within this period, the player's action buttons are displayed, and the turn will pass to the next player at the table after they choose an action, or the timer runs out. It's important for these coroutines to be able to interrupt their action gracefully to avoid bugs or interaction conflicts, so I made an explicit list of coroutine modes using enums:
| |
The coroutines have two states: Active or Inactive. Depending on the state, we can trigger an action to force them to either Stop or Reset. A simple example of this is the following:
| |
If the coroutine is running and the player performs an action mid-coroutine, thus the coroutine is in the Active state, we could either stop it or reset it. This is good because inside of it, the coroutine can perform a series of actions based on the 'state' before exiting. For instance:
| |
When the coroutine stops by
CoroutineState.Stop
, the code inside the
if
block gets executed before the
yield break
. We set the Coroutine state to Inactive, then we stop the coroutine by calling its reference (
playerTurnCoroutine
) and make it null so that it can be used later. Finally, we exit the coroutine right there
before triggering any other logic down the function.
Likewise, when the coroutine resets by
CoroutineState.Reset
, specific logic that involves specific updates and events would trigger before the resetting.
All animations in this project are achieved by directly manipulating the transform properties of objects via code, which is more efficient and less messy compared to alternatives like the Animator. An animation I'd like to highlight is the movement of blinds across the table, following a Bezier curve to form an ellipsoid shape. To establish this curve, I defined four positions to act as guiding points for all the compounding waypoints:
I refer to these guiding points as Control Points. The transform positions of the Control Points are just stored as Vector2. Then, I implemented the quadratic Bezier curve formula (P(t)=(1−t)2⋅P0+2⋅(1−t)⋅t⋅P1+t2⋅P2), which takes into account the positions of the control points to calculate the waypoints representing the trajectory of the curve:
| |
This method iterates over
t
with an increment of 0.05 within a normalized range that goes from 0 to 1,
resulting in 20 waypoints (1/0.05) for each curve. With two mirrored
curves, we get an ellipsoid shape as depicted in the image below:

All waypoints defining the ellipsoid shape are stored in a list, ready to be used for animating the blinds along the path:
| |
The coroutine begins by initializing the object's current position and iterates over
t
values, incrementing them based on time and speed. Using linear
interpolation, it calculates the position of the blind between the
current index and the next index along the curve. Each iteration
systematically manages index transitions to ensure smooth movement
along the waypoints. The coroutine monitors the index count to determine
when to exit upon reaching the target waypoint of the movement sequence.
All visual assets, except for UI buttons, were hand-drawn using Photoshop and fine-tuned with optimized import settings when brought into the engine. Because manually creating assets is time consuming, I tend to apply time-saving techniques wherever possible. Take the chipset assets as an example:

Each asset shares common design elements but differs in chip type and color values. This approach is similar to the concept of prefab variants, using a base template that accommodates multiple variations, combined with postprocessing effects like shadows, lighting, color, etc. In situations like this, you can choose to either pre-bake all chip assets into the engine or use only a few base templates and apply postprocessing effects dynamically within the engine. The former takes-up more memory while saving CPU processing time, whereas the latter is more CPU-intensive but requires less memory. Since the chip assets in this project are small (32x32 pixels) and have a negligible memory footprint, I decided to bake them in directly in a Sprite Atlas.
It's important to consider that many of these assets are active simultaneously during gameplay. Rather than repeatedly instantiating and destroying chips, which can incur significant overhead, I've implemented pooling systems to manage them. By pre-allocating a pool of chipsets at the start and dynamically enabling and disabling them as needed, I minimized the performance impact associated with object creation and destruction.
User Interface
I used built-in UI components for handling static graphics such as buttons, sliders, blinds, chips, etc. Canvases simplify the process since they support anchoring of elements and resolution scaling, which is necessary for multiplatform development.
A correct use of anchors and pivots is key when dealing with dynamic UI elements. Anchors define an element's position relative to its parent, while pivots determine the point within the element that its position, rotation, and scale are based on. The idea is to manipulate these settings in a way that ensures UI elements adapt properly across different screen sizes and resolutions, as is the case for mobile devices. For instance, let's say that we have the following layout for a slider element:

We need to ensure that the slider is anchored to the right side of the screen, while allowing for some padding or margin. In the example, this padding/margin is set to 2% of the screen width, so we need to adjust the normalized values for the anchor and pivot settings:
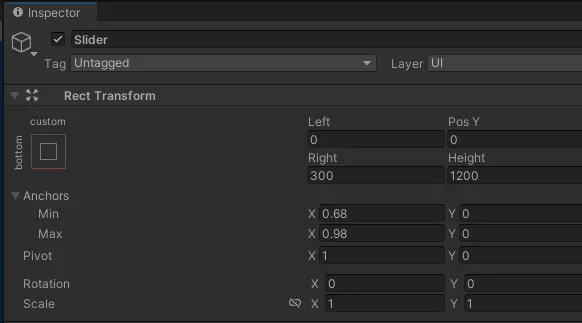
The
anchor.Max X
value represents the normalized position of the right edge of the anchored RectTransform
relative to the parent RectTransform's right edge. To leave a 2% margin on the
right side of the screen, this value should be set to 0.98 (remember they are
normalized).
Similarly, setting
anchor.Min X
to 0.68 ensures that the left edge of the RectTransform is positioned at 68%
of the parent's width, effectively occupying 30% of the screen width.
Lastly, the pivot has to be set to the right corner of the RectTransform by setting
Pivot X
to 1, ensuring proper alignment with the right-most side of the screen.
Also, unique device features like phone notches must be taken into account. Incorporating features like 'Safe Areas' ensures that UI elements remain visible and unaffected by device-specific design elements.
Here's how it works:
| |
The script retrieves the device's safe area from the
Screen
class and adjusts the size of the panel, containing UI graphics/elements,
to match the safe area. This ensures that UI elements are properly
positioned and remain visible regardless of the device's screen
size or aspect ratio.
Additionally, to improve performance when dealing with numerous safe area objects, I consolidated all the screen size and orientation checks into a single script that polls inside an async task every X time (I believe it was 1 second). This script then propagates an event to all safe area objects whenever a change is detected. This approach significantly reduces unnecessary overhead, which is particularly good on mobile platforms.
The methodology I followed in this project aligns with the one discussed in Atomic Tiles. In general, during development, I remained mindful of the GPU workload (e.g., draw calls, set pass calls), CPU workload, and memory footprint, profiling regularly to make sure everything fits within the budget. I believe that using optimized developing practices from the early stages of development can save a lot of time and effort later on. However, this doesn't mean micro-optimizing unnecessary parts prematurely. Therefore, I aim to balance writing efficient code with maintaining development speed. This means avoiding micro-optimizations before identifying the actual bottlenecks of the application. That said, during the profiling phase, it's important to ensure the cumulative workload stays within the allocated budget (time-MS and memory limits) on the target platform, and bottlenecks becomes the main focus to achieve this.
For instance, let's focus solely on the gameplay programming. If the total budget falls below 16 MS for mobile development, and you have only 2-3 MS for game logic (say that graphics take up a significant portion of that budget), it becomes important to use of optimized code, particularly in areas that run continuously or within extensive loops. Minimizing unnecessary polling and adopting event-driven approaches can significantly reduce overhead. Additionally, avoiding unnecessary garbage allocation in managed languages like C# is essential to prevent substantial Garbage Collector spikes that could exceed the budget, resulting in a drop in framerate on the target device.
However, when evaluating the project as a whole, the initial focus should be on optimizing the areas that consume the most time within the allocated budget, as aspects like rendering can occupy unnecessary resources that could otherwise be streamlined.
Tweaking the framerate is a quick adjustment that can have a drastic impact on performance in mobile development. Phones use much more CPU power and their battery drain faster when running at 60 fps. Even in an empty project, this remains true because the device renders the screen 60 times per second. Limiting the game to 30 fps can immediately double performance but, unfortunately, this may not be feasible for most games. In games where animation and smooth motion are important, running below 60 fps is out of the question; otherwise, the game may appear choppy and unresponsive. Thus, optimizing it to maintain 60 fps while mitigating heat generation and preserving battery life is crucial.
For this particular game, where gameplay often involves idling until an action occurs,
it was possible to render at lower framerates during idle periods and increase it to 60 fps
during actions or animations.
However, reducing the framerate may not always feel right, as it can lead to
missed player inputs and an
unresponsive game feel. Fortunately, Unity (as many engines and frameworks) provide a
class called
OnDemandRendering
that is suited for this scenario. Unlike adjusting the framerate,
this class effectively reduces rendering speed without impacting
internal tick processing (including inputs):
| |
In the code snippet above, the game is rendered at 10 frames per second until an action occurs, at which point rendering is restored to 60 frames per second, ensuring fluid and natural animations. As a result, after having done all the optimizing, devices consume less battery, and they won't get excessive heating at any point while running the application.